

1. Designing the zone grid
Before you model anything, decide what you’re asking drivers to do. This is the part that determines whether your track judges well — geometry mistakes are easy to fix later, a badly conceived zone is not.
What a zone is
A zone is one judged section of track: an outer clip, an inner clip, a sweeper. Drivers are scored on how deep they get and how much angle they hold through it.
CHAPPiE represents a zone as a grid of invisible meshes, split two ways:
- Length — steps along the zone, in the direction of travel
- Depth — bands going in from the track side toward the wall
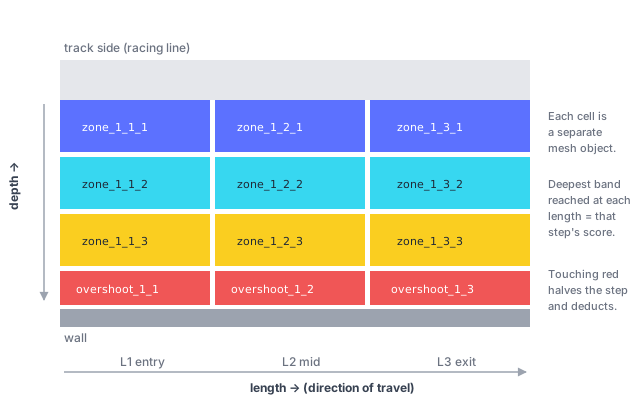
Every cell is its own mesh with its own name. That’s the whole mechanism.
At each length position the mod records the deepest band the car reached, divides by the deepest band you authored, and averages across the zone. See scoring model for the exact maths.
How many depth bands
Three to five. Below three there’s not enough resolution to separate a good line from a great one. Above five, the bands get narrower than the car’s own detection footprint and depth 4 vs 5 becomes noise rather than skill.
Four is a good default: obviously shallow, decent, good, wall-scraping.
Bands do not have to be equal width. Making the deepest band narrow is a legitimate way to make the last 25% genuinely hard to earn.
How many length steps
Enough that a driver can’t skip the middle. Three to six is typical for a clipping zone.
The important property: a length position the car never enters scores zero, not “shallow”. A driver who runs wide past your entry step loses that step entirely. So the steps should cover the whole section you care about, with no gaps a car could pass through untouched.
Fewer, wider steps are more forgiving. More, narrower steps discriminate harder between lines.
Where depth 1 starts
Depth 1 should be the shallowest line you’d still call “in the zone” — not the racing line, and not off the track. A driver who never gets deeper than depth 1 should score poorly but not zero.
If depth 1 starts at the very edge of the track surface, drivers get points for doing nothing. If it starts halfway to the wall, everything below it scores zero and the zone becomes pass/fail.
The overshoot strip
Without it, deeper is always better and the correct strategy is to aim at the wall.
Place overshoot_{zone}_{length} immediately beyond your deepest band at each length position. Touching it halves that position’s ratio even if max depth was reached, and costs a deduction.
Make it wide enough that a driver who genuinely ran out of road can’t slip past it into empty space. It should sit between your deepest band and the wall, covering everything in that gap.
Angle windows
By default a zone uses the global MaxExpectedAngle. If a section demands a specific window — a tight inner clip that should be held at 40–55° rather than sent at 70° — add a zone_angle_{ID}_{min}_{max} marker.
Use these sparingly. Every window you set is a judging opinion you’re baking into the map, and drivers will feel it.
Sketch it first
Take a top-down screenshot of your track and draw the grid on it before opening Maya or Blender. You want to have decided, per zone:
- ZoneID
- how many length steps and where their boundaries fall
- how many depth bands and where the deepest one ends
- where the overshoot strip sits
- whether it needs an angle window
That list is exactly what you’ll type into the SDK inspector later. Having it settled makes the modelling step mechanical.
Next: 2. Building the meshes